HOW TO TRACK PURCHASES IN AN ONLINE STORE USING GTM?
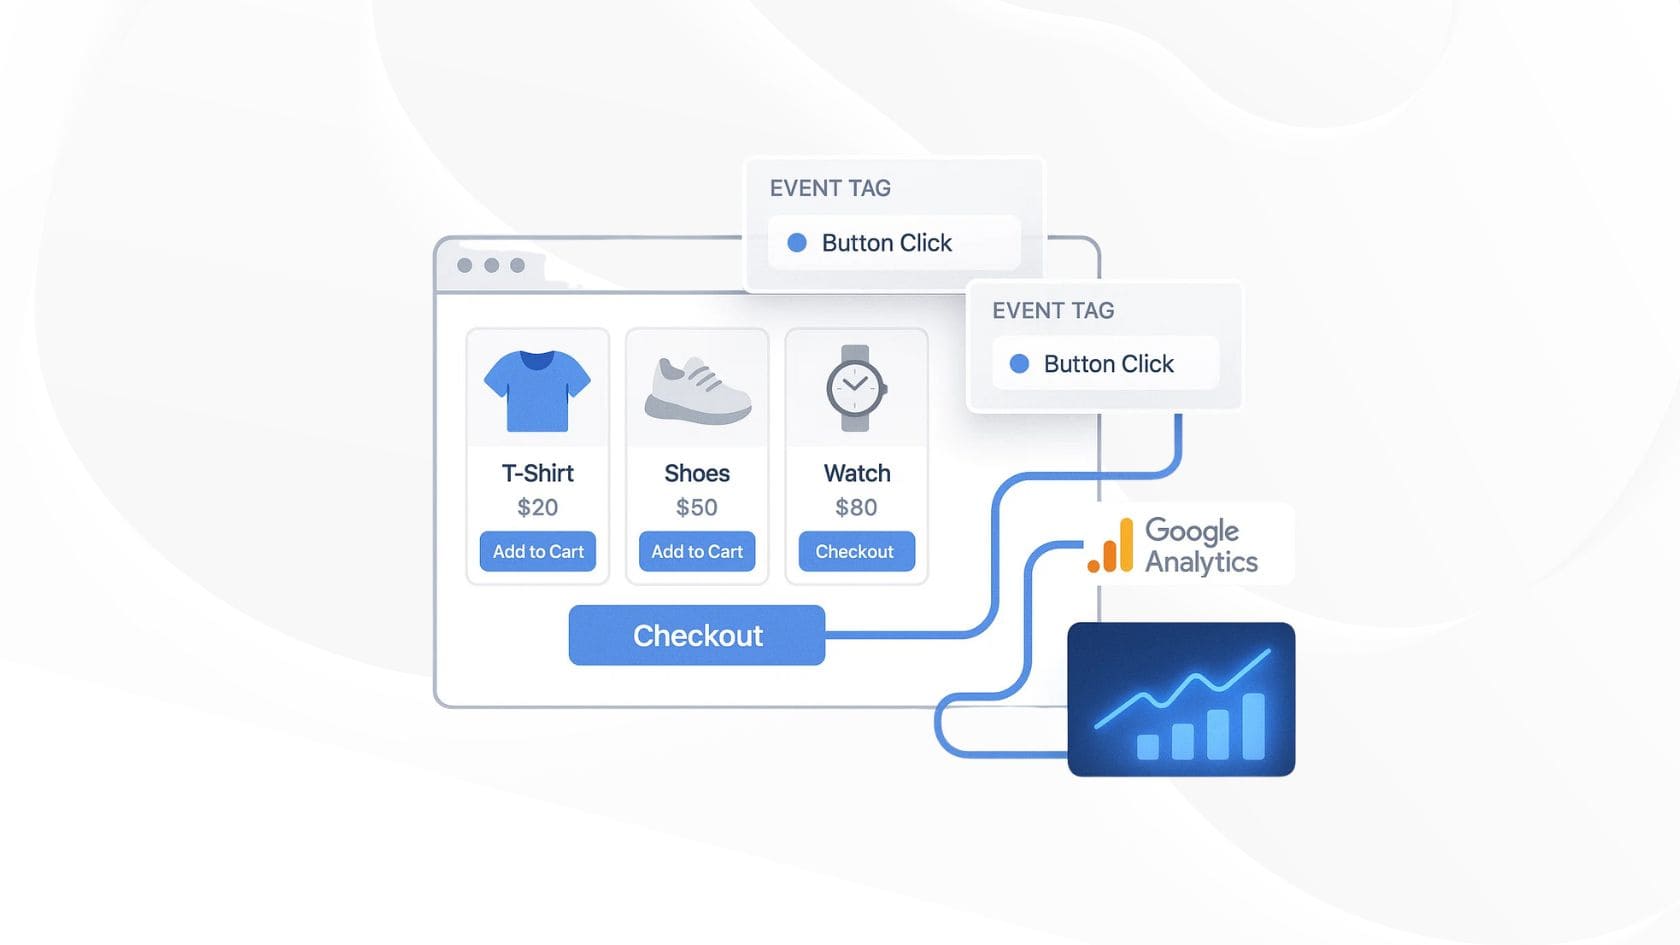
For any online store, it is important to know who buys what and when. For this purpose, Google offers a free service—Google Analytics 4—which provides many opportunities for analyzing user actions on the website.
To fully unlock the capabilities of Google Analytics 4, it is necessary to send correct data to the service. Most modern CRMs have an integration with GA4, and to transmit the data, it is sufficient to enter the analytics stream code in the settings. However, some of them offer this feature only for a fee or do not offer it at all, so to set up data transmission to GA4, you need to involve a developer or configure the transmission using code in GTM.
In this article, we will show how to track and send the purchase event to GA4.
What’s it about?
- Setting up purchase event tracking
- Getting data from the Order Confirmation page
- Collecting data and sending the event to Google Analytics 4
Setting up purchase event tracking
Before starting the setup, it is necessary to analyze the website pages and find the elements from which the required data can be obtained.
Referring to the Google Documentation, we see that the following parameters are required for the event:
currency— 3-letter currency code according to ISO 4217value— the total amount of items added to the cartitems— the list of items added to the cart as an array
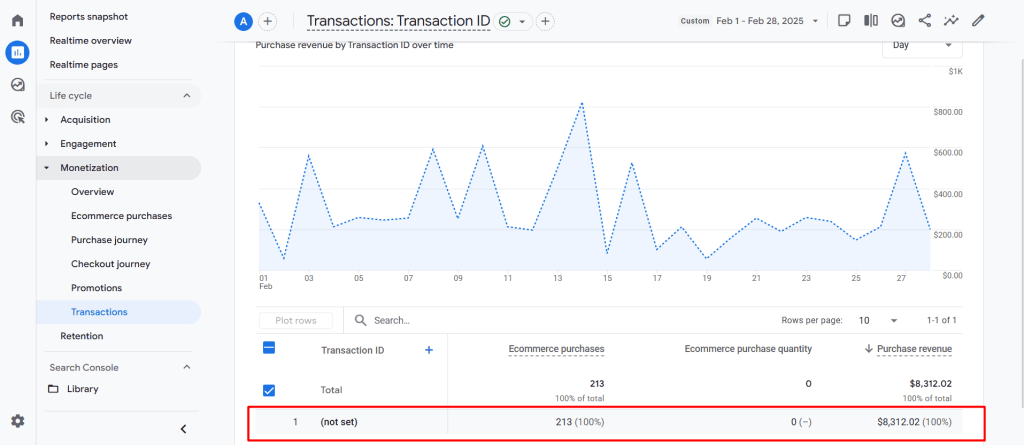
In my opinion, it is also necessary to send the transaction_id parameter (order number). This parameter is not required, but without it, Google Analytics 4 will group orders in reports under the name “(not set)”.
Getting data from the Order Confirmation page
In different online stores, the Thank You page looks different. Some pages display both the order number and the list of purchased items, which allows you to get all the data on one page right after the purchase is completed. But what if the Thank You page lacks such information? Let’s analyze that case now.
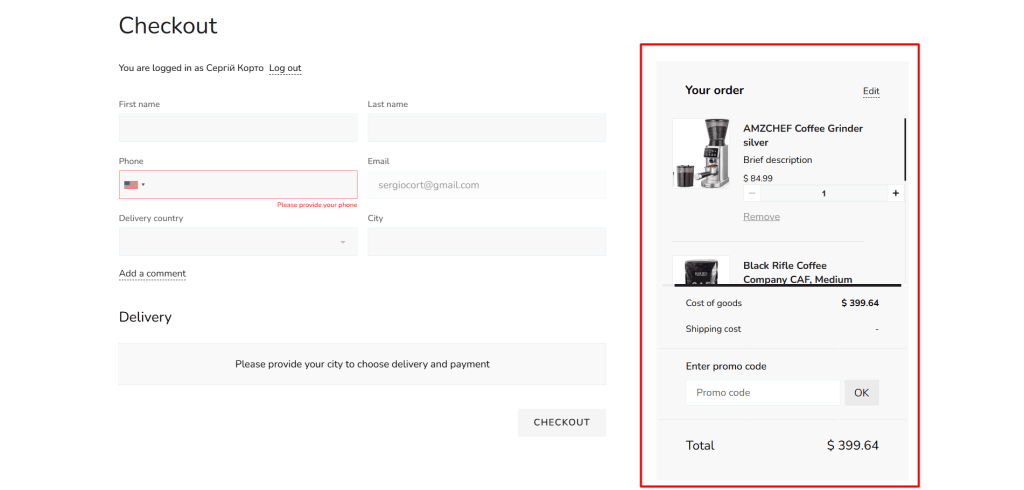
First, go to the Order Confirmation page. On this page, there is a list of items to be purchased, the quantity of each item, and its price.
To collect and store this data, we create a new tag in the GTM container with the type “Custom HTML” and add code that collects the necessary data about the list of products and saves them in Local Storage.
We use Local Storage because the data must be obtained on the Thank You page. Local Storage allows us to store the data even if the customer is redirected to an external payment service and then lands on the Thank You page of our site.
So, we create a new tag in the GTM container, give it a clear name, and set the trigger to a click on the “Checkout” button.
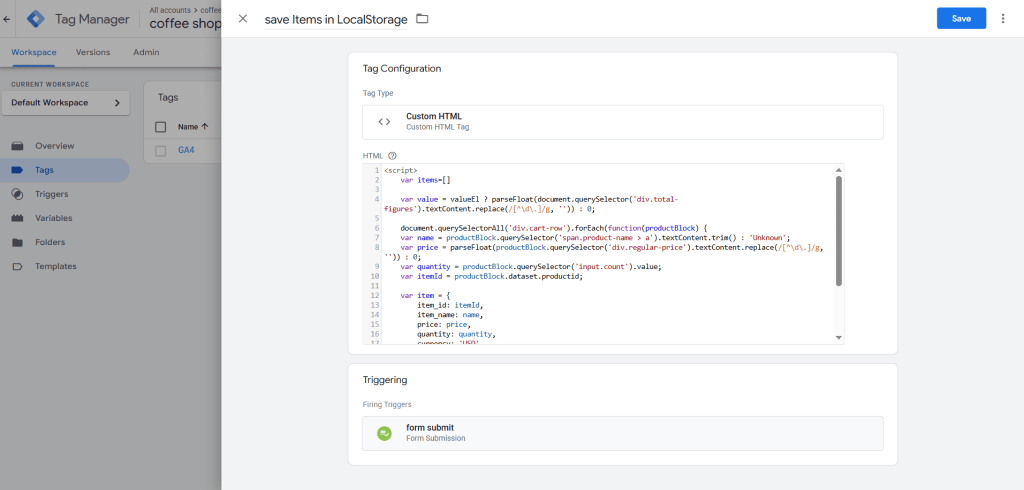
Add the following code to the tag and save the changes:
<script>

 var items=[]

 var value = valueEl ? parseFloat(document.querySelector('div.total-figures').textContent.replace(/[^\d\.]/g, '')) : 0;

document.querySelectorAll('div.cart-row').forEach(function(productBlock) {

    var name = productBlock.querySelector('span.product-name > a').textContent.trim();

    var price = parseFloat(productBlock.querySelector('div.regular-price').textContent.replace(/[^\d\.]/g, ''));

    var quantity = productBlock.querySelector('input.count').value;

    var itemId = productBlock.dataset.productid;

    var item = {

        item_id: itemId,

        item_name: name,

        price: price,

        quantity: quantity,

        currency: 'USD'

    }

    items.push(item);

    })

    localStorage.setItem('items', JSON.stringify(items));

</script>
What this code does:
- Retrieves each product card from the list.
- Extracts product ID, name, price, and quantity from each card.
- Creates an
itemobject with the previously retrieved parameters. - Saves the
itemobject to theitemsarray. - Saves the
itemsarray in Local Storage.
Collecting data and sending the event to Google Analytics 4
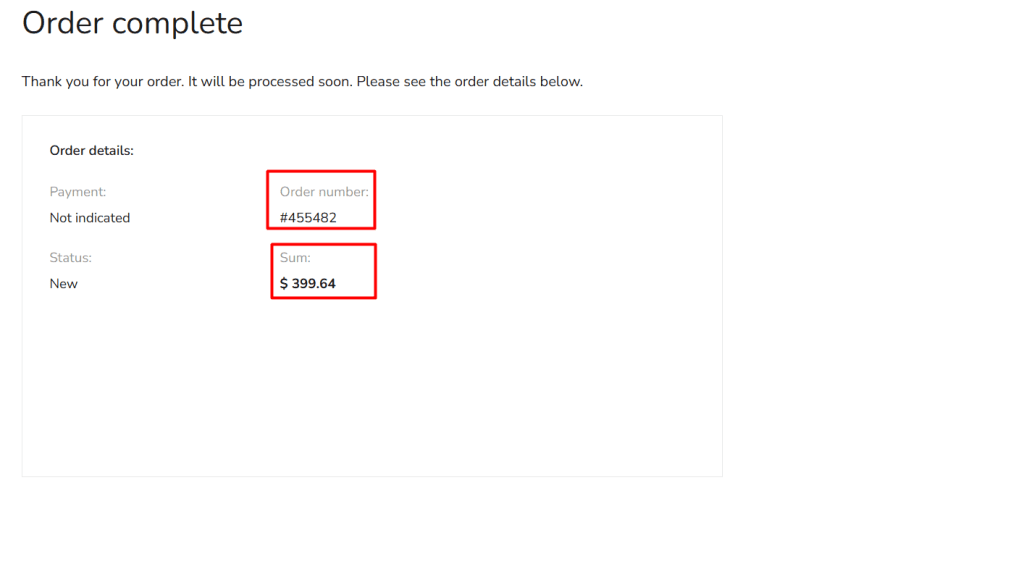
Now go to the Thank You page. The user lands on this page after confirming the order or making the payment, depending on the selected payment method. This is the page where we must send the purchase event to Google Analytics 4.
On our page, you can see the order number and the order total, but the list of purchased items is missing—this is why we previously created a tag to save this data, and now we can retrieve it from Local Storage.
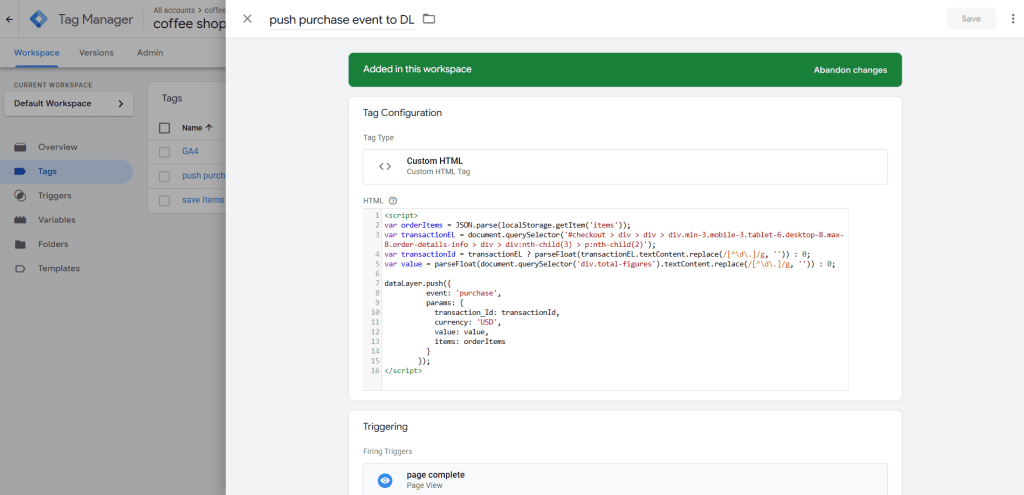
Storing the purchase event in the dataLayer
In our GTM container, we create a new tag of type “Custom HTML”, and the trigger is a page view where the Page URL contains /shop/complete/. Add the following code to the tag:

Add a code to the tag.
<script>

var orderItems = JSON.parse(localStorage.getItem('items'));

var transactionEL = document.querySelector('#checkout > div > div > div.min-3.mobile-3.tablet-6.desktop-8.max-8.order-details-info > div > div:nth-child(3) > p:nth-child(2)');

var transactionId = parseFloat(transactionEL.textContent.replace(/[^\d\.]/g, ''));

var value = parseFloat(document.querySelector('div.total-figures').textContent.replace(/[^\d\.]/g, ''));

dataLayer.push({

          event: 'purchase',

          eсommerce: {

            transaction_Id: transactionId,

            currency: 'USD',

            value: value,

            items: orderItems

          }

        });

</script>
What this code does:
- Retrieves the list of purchased items from Local Storage.
- Extracts the order number from the page.
- Extracts the order amount from the page.
- Pushes the
purchaseevent todataLayerwith all the parameters.
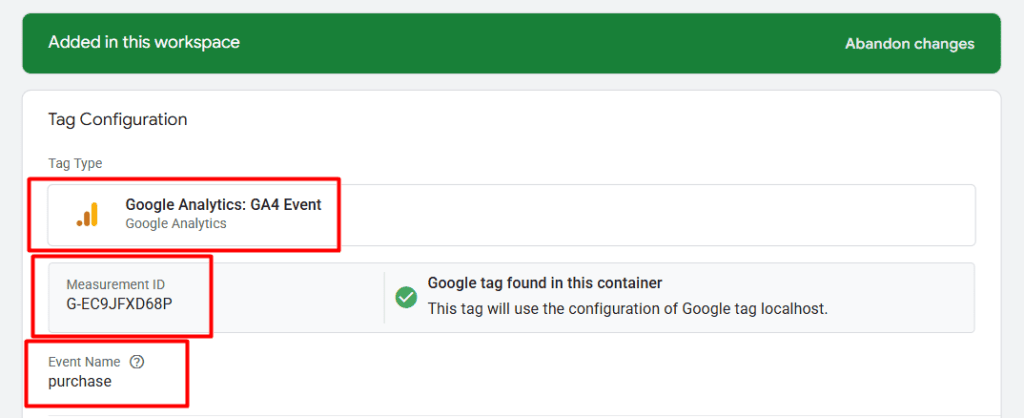
Sending the purchase event to Google Analytics 4
Now we just need to send all the data.
In the GTM container, create a new tag of type “Google Analytics: GA4 Event”, specify your GA4 stream tag, and set the event name as purchase.
In the settings, select the option “Send Ecommerce data”.
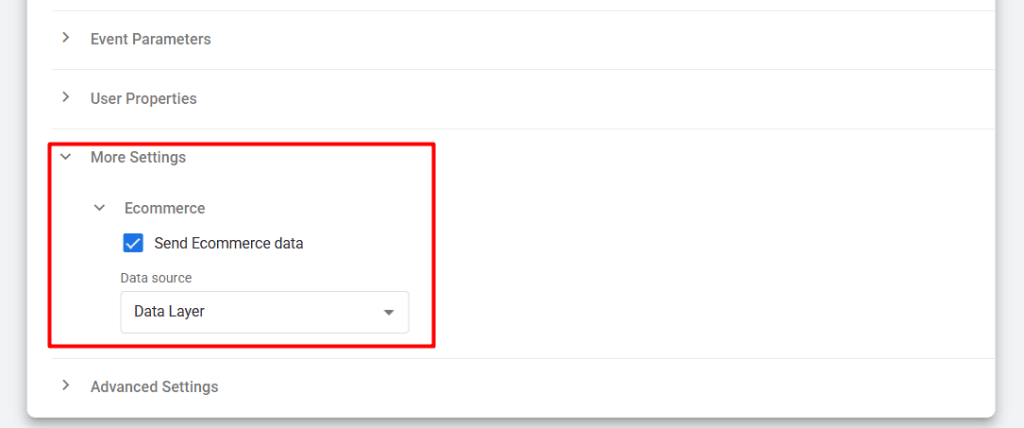
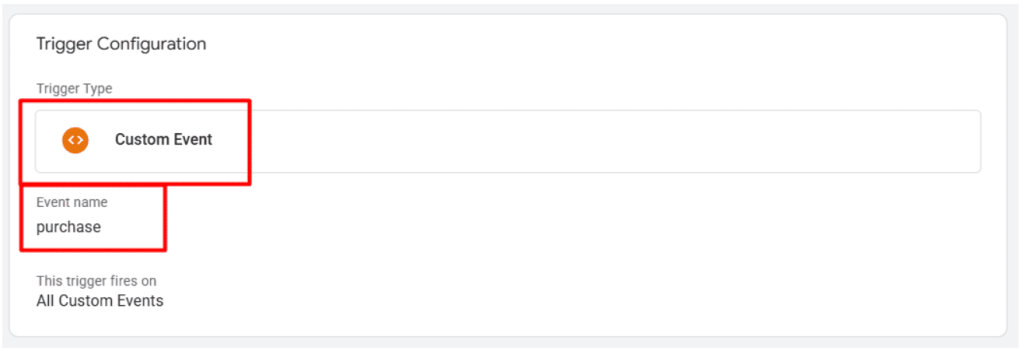
Create a trigger of type “Custom Event” and set the event name as purchase.
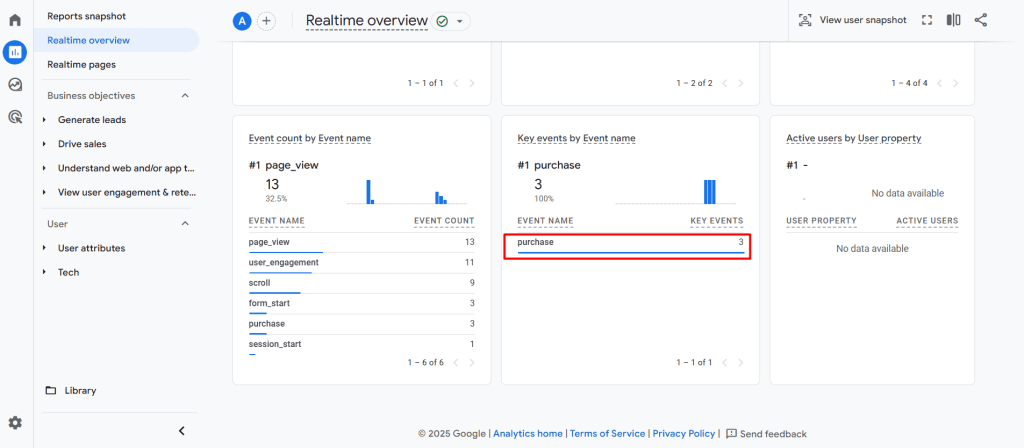
After testing the events, you can see your order in the Google Analytics 4 dashboard.
After 24 hours order data will be available in GA4 reports.
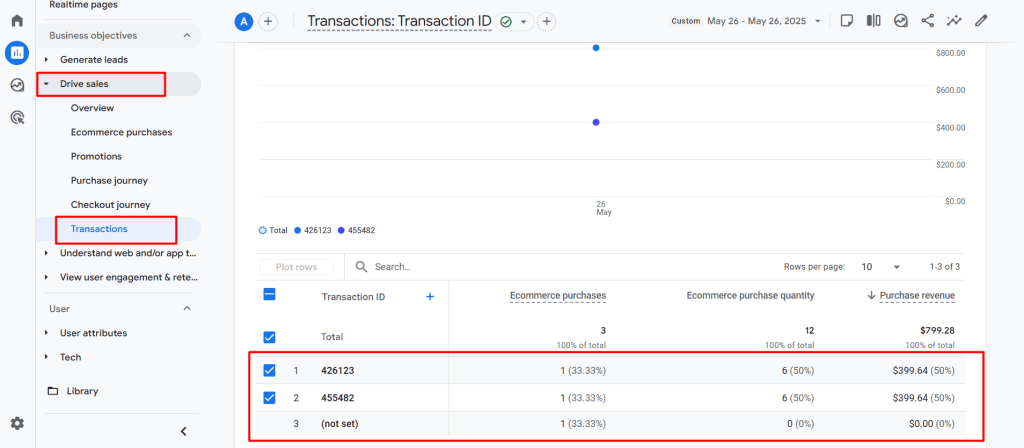
In the Drive sales > Transactions section, you can see order numbers, item quantities per order, and order totals.
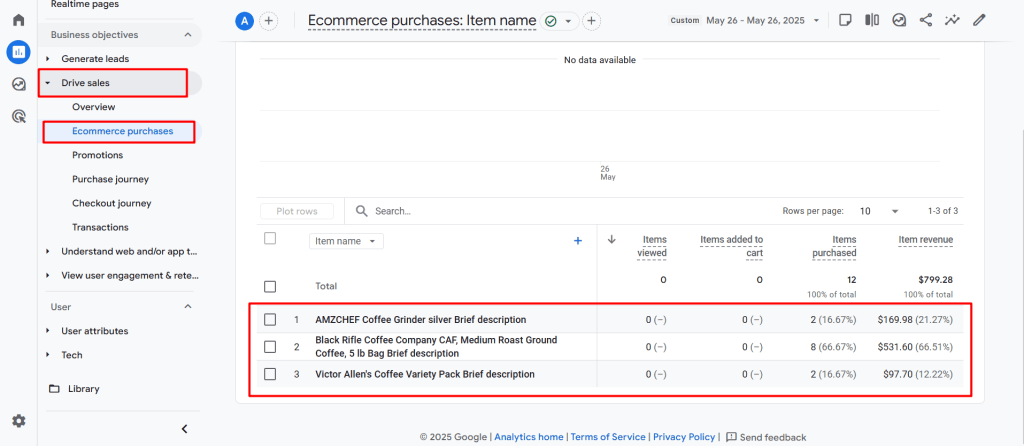
In the Drive sales > Transactions section, you will now also see a list of products from the orders, their quantity, and the revenue from each product.
Conclusions
Setting up the purchase event tracking in Google Analytics 4 can also be done through Google Tag Manager by collecting the necessary data from website pages. To do this, you need to analyze the page code, find the elements containing the required information, and use JavaScript to send them to analytics.